Wednesday, May 1, 2024

Drawing Hair for Beginners Graphite and Colored Pencil Techniques

hair sketch

In layered hair, V shapes are created — which also occurs when drawing animal fur, feathers and flower petals. These V shapes are where things overlap and recede, and the deep V of darkness gives the illusion of depth. Using your 4B pencil, darken the areas closer to the head and add some extra hairs on the top of the blended areas. This will give the illusion of depth and add extra texture to your hair.

Step 5: Adding Final Touches

Use more curved lines to build the hair strands and dark areas of overlap. With your mechanical pencil, fill the locks with soft and small traces following the flow and movement of the hair. Apply more pressure and layers to the part right beside the neck and under the ear.

How to Draw Different Eye Types Step by Step

By studying and observing real-life examples, you’ll be better equipped to recreate them on paper. Using the same rolling shapes as before, fill out the rest of the hair until you reach the back of the head. Draw bigger curls within the outline, following the direction you've established before. Each strand should be divided into more strands at the tips.

Step Four: Fill in the hair with texture

You’ve almost finished drawing the thin lines for your realistic hair drawing, and in this step you can finish this element off. Continuing on from the previous step, we shall draw more thick lines on the right-hand side of your realistic hair drawing. Slowly darken the drawing by applying more layers of overlapping strokes.
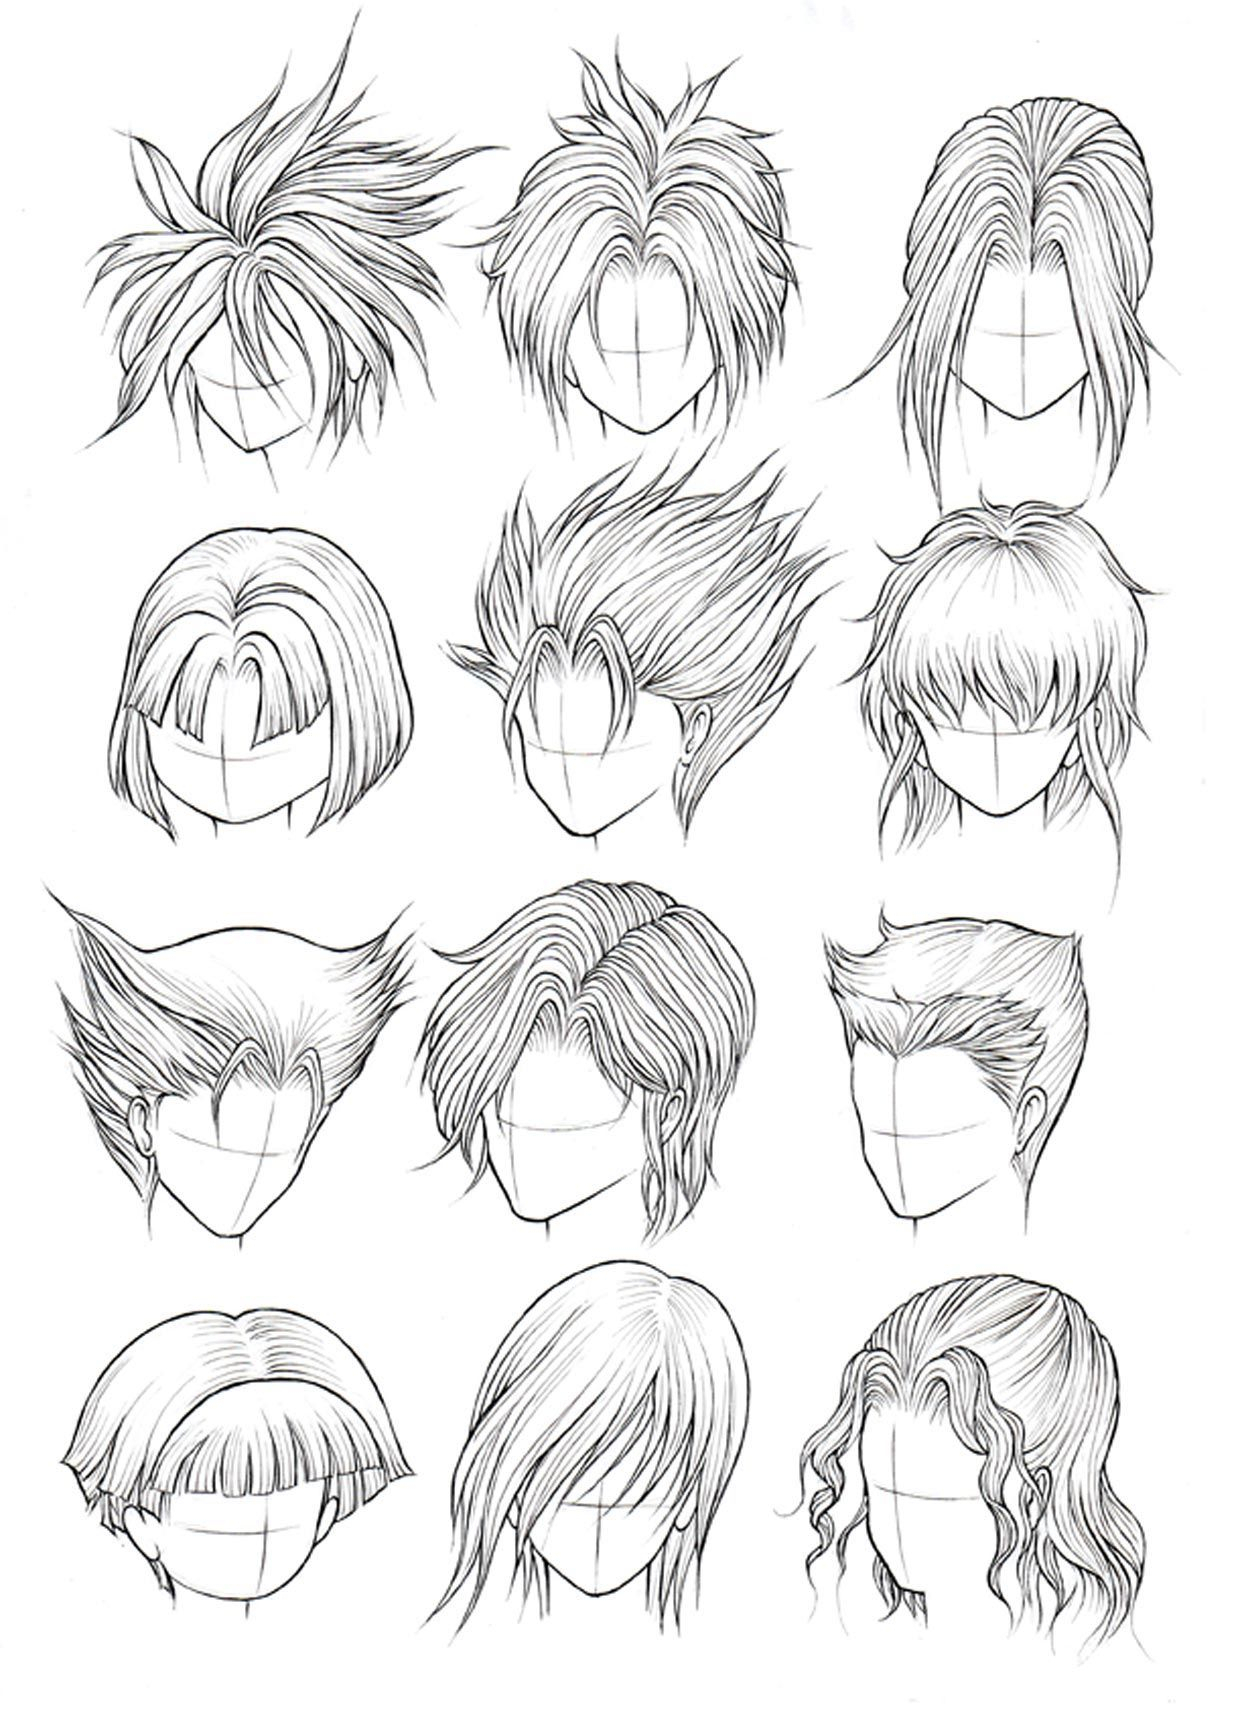
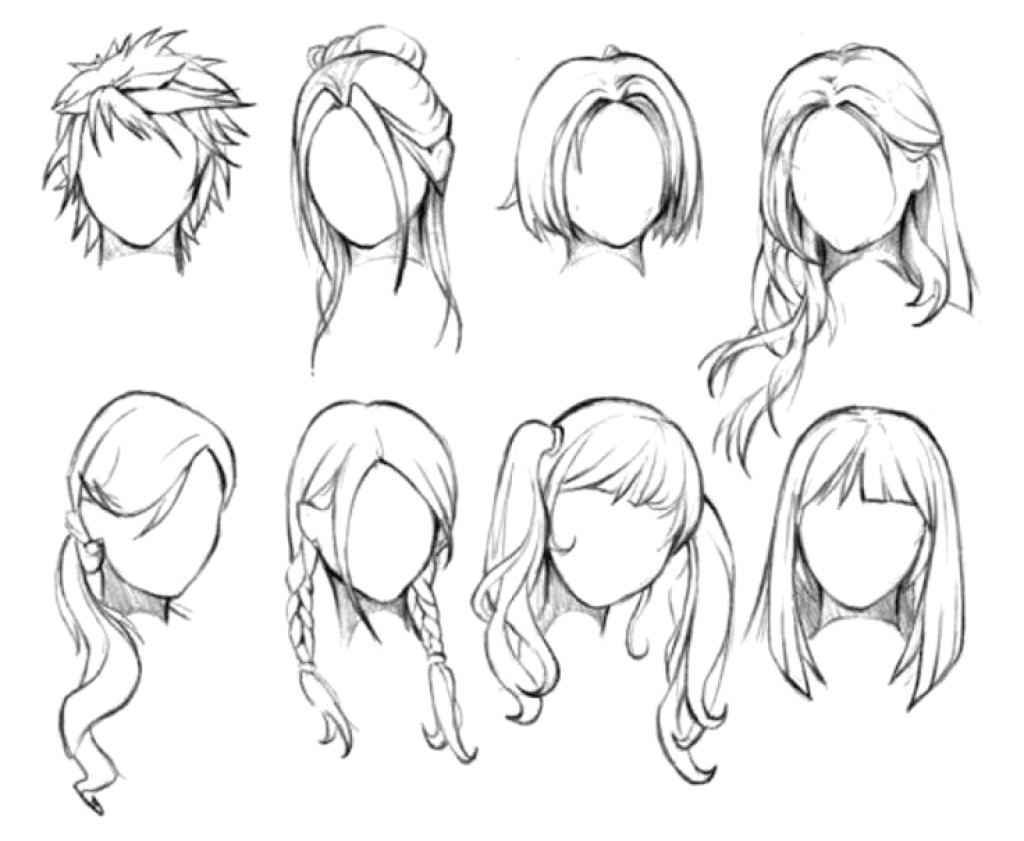
Types of Hairlines

This can be anywhere (left, right, center), but it may help to look at a couple of photo references first. Shade the haircut in a more definite way, drawing shadows between groups of curls. Draw the direction of the strands all over the head.

You could easily color smaller strands and sections of the hair in order to add some great highlights. First, draw some thin, stray hairs coming out from the hairstyle. This part is fairly optional, as while these hairs create a more realistic look, you could use less or none at all for a neater appearance. Nothing ruins a well drawn cartoon head like ugly drawn hair.

Similar to the first example begin by drawing the main shape of the hair with the largest details over top of the head/hairline. To avoid your drawing getting overly clutter erase the parts of the head covered by the hair after you are done. Begin the drawing by first outlining the entire shape of the head (including the ears). Doing so will help you better estimate the volume of the hair.

Be sure to leave some space between them to create an effect of individual hairs. Although unlike the previous example you can make them slightly less apparent to give the hair a smoother and neater look. Adding color to the mix can bring your drawings of people to life, but it can also make the drawing process even more complex. It’s important to note that drawing, especially portraits, is not something you can learn in a day. Drawing people accurately takes a solid understanding of anatomy and a lot of practice. So be prepared to do a lot of work before diving in and trying to draw the favorite people in your life.

hair sketch

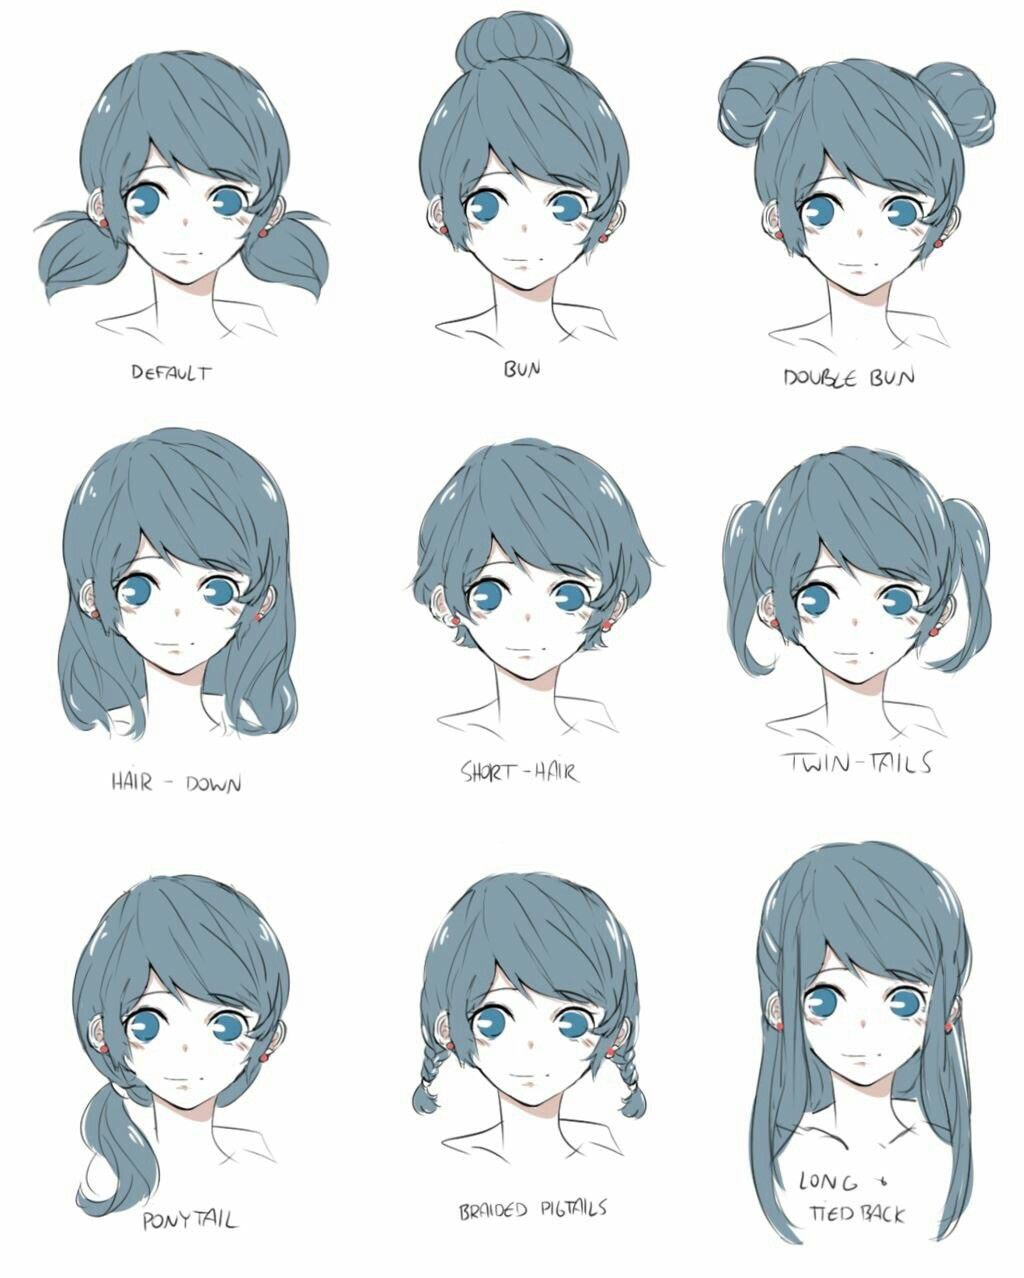
Analyze the unique characteristics of each style, such as the partings, braids, updos, or ponytails, and practice replicating them in your drawings. Use an eraser to create highlights and add fine details that enhance the overall texture and appearance of the hair. Take time to observe and analyze the characteristics of each hair type. Pay attention to how the hair flows, how it reflects light, and the overall shape and volume. Move your pencil to the hair part and sketch bouncy, cloud-like patterns until you are just above the shoulders (or wherever you prefer).

Ryan Gosling and Mikey Day's Beavis and Butt-Head Had the SNL Cast Cracking Up - NBC Insider

Ryan Gosling and Mikey Day's Beavis and Butt-Head Had the SNL Cast Cracking Up.

Posted: Sun, 14 Apr 2024 07:00:00 GMT [source]

If you WANT to know how to draw but don’t know where to begin — you’ve come to the right place. You can now begin to create highlight shapes, if you want. Instead of drawing every single strand of hair, it's helpful to separate hair into clumps. You're going to design your character's hair using flat shapes until you come up with something that seems right to you. Before I begin, let's take a look at some very simple cartoon hair examples you can easily use even now...

Note that those areas are places where the light doesn’t hit directly or where the hair overlaps. Hair is affected by gravity and, on the contrary, on the top of the head, the hair on the sides falls down. The small volume it can have is because of bouncing with the ears.

Draw some more thin tips on the bottom of the haircut. Add gentle waves above the first strand-lines without touching them. Draw the outline of the strokes surrounding the face. Hair is grouped in strands, and that's what we see.

• My first step was to draw the outline of the main lock (the one which will be the base of our drawing), following the direction in a S shape. As my drawing advances, I ponder some possibilities for drawing the hair. This character will have straight hair, cut just over the shoulders. I think no bangs would be better, but I want some hair to cover one eye, and the tips of the hair to curl inwards.

Use several short, curved strands to give it a bit more volume but keep it close to the head. For this section, we will use our 4B pencil, powdered graphite, brush, blending stump, and kneaded eraser. Let’s keep in mind that there is always space between strands and over layers of hair, which builds up to create volume. You can also consider adding background elements or accessories to complement the hairstyle and enhance the visual storytelling.

How to Draw Realistic Hair: 14 Steps with Pictures

hair sketch

Add some loose small, and long hairs with your mechanical pencil for an extra touch of realism and fluidity. Again, with your mechanical pencil or your 4B pencil, mark the hairline position very softly. Hair is so different from each other that using the same technique for every type of hair would be impossible. Each type needs its own technique, and some are easier and simpler while others take a long time to do. On the other hand, straight hair has serene, calm, simple and maybe elegant lines. Try to follow your intuition when drawing shadows and highlights for hair.

Step 3 – Draw the Outline of the Hair

The perspective and angle of the head might make them look smaller or narrow. Drawing hair can be a challenging yet rewarding endeavor for artists. Consider the direction and flow of the hair strands, and add subtle curves or arcs to convey a sense of motion. This will make your drawings appear more lively and engaging.

Step 14

And when I draw it, I like to give it a prickly, pointy, rough appearance. I followed all these criteria to brush up my character and then I added the necessary amount of detail while keeping it simple. • I added some texture, following the direction of the curves.

Curly hair

In the following sections, we are going to use two shading techniques for the two types of hair we’ll be exploring. If you can, draw your own head base, but if what you’re looking for is pracrice, you can printe the one we have right here and draw on top of it. Hair can represent social status, gender, ethnicity, and other features that are important to people. It is worn in different styles, colors, lengths, and textures.

Gradually darken the overall drawing until you create a good balance between the various areas of the hair. Be sure to keep the strokes in the light and mid tone ares visible by leaving some distance between them. After you draw the hair strands, use Terra Cotta to give it a reddish shine. Leave a band of light in the protruding areas so the hair looks curved and wavy.

Before You Start

Hair is a very important point of expression for our characters, so drawing hair exactly as we imagine it can be a real challenge. I try to break it down and think three-dimensionally and consider the volume and shape of the hair form with drawing hair. To further enhance your hair drawing skills, seek feedback and constructive critique from fellow artists or mentors. Join art communities or online forums where you can share your work and receive valuable insights from others. Now that you have the basic structure, strands, and volume, it’s time to refine the details. Pay attention to smaller elements like flyaway hairs, wisps, and stray strands to add a sense of realism.

'Nowhere near as angry': Sketch artists prepare for historic Trump criminal trial - ABC News

'Nowhere near as angry': Sketch artists prepare for historic Trump criminal trial.

Posted: Sat, 13 Apr 2024 07:00:00 GMT [source]

To begin, lightly sketch the basic shape of the hairstyle you want to draw. Use simple shapes like ovals or rectangles to define the overall structure. This step will serve as a foundation for the rest of your drawing.

People are some of the most fascinating and difficult subjects to draw. From rendering the complexity of eyes to the shapes of lips, there are many different nuances involved. And, while facial features capture the likeness of a person, hair can say a lot about their personality and style. Finally, you could finish off this character by adding a face to it. We kept the face of this realistic hair blank to make it look like a mannequin. For the simplest of all cartoon hair types, you're basically done.

Each style includes step by step drawing examples and explanations. Then, use long, curved pencil strokes to create the shapes of the curls. It has to do a lot with the shape of the head and the position and type of hairline. Before you start coloring in your drawing, we shall add some final details in this step of our guide on how to draw realistic hair. For this part of your realistic hair drawing, simply keep drawing more thin lines to the upper right section of the hairstyle. Lightly draw the shapes of the hairline, ear and overall shape of the hair with mechanical pencil.

hair sketch

Using our reference image as your guide, carefully draw the head outline sitting on a neck using your pencil. To do this, you will need a light pencil for this first step, as you will be drawing somewhat of a mannequin head that you will draw the hair onto. If you asked a group of artists whether realistic hair is easy to draw, it’s doubtful that many would answer yes to that question. Well, because when we look at a person in real life, we don't see every individual hair strand. What we see is a mass of hair that creates a certain shape. We recognize it as lot's of hair and we notice it's texture but our first impression is it's shape.

Close the shape of each strand by mirroring its wave and adding a pointed tip. In this case it will also be the outline of the whole haircut. In this lesson I'll show you three simple ways to approach hair that will make your cartoons look far more professional. Add in the smallest sets of hair splits, folds and clumps to finish the line drawing. Erase the hairline and parts of the head covered by the hair once done. Same as the previous example begin by making an outline drawing of the head.

Gently outline the hair without drawing lines that are too thick. Make the general outline complete by drawing the hairline next to the ear. Shade the hair now, thinking in terms of strands, not single hairs. Outline the whole hair, following the rhythm of strands.

Now that we have a quick lesson on drawing hair in graphite under our belt, let’s learn a few tips for drawing hair with colored pencil. Make sure to fill it all and to make some of the curls noticeable outside of the hair shape. To enhance your hair drawing skills, take the time to study and collect references of different hairstyles, haircuts, and hair arrangements. Over top of the drawing of the head add an outline of the main shape/shapes of the hair.

The full-color portrait, above, shows how reflective color can be. If you look closely, you can see the subtle blue tones reflecting onto the skin and hair of the subject. I love drawing hair and all of the waves and colors being reflected throughout it.

hair sketch

Adding realistic hair to a portrait can make it come to life. It's totally understandable if you're feeling intimidated, but we've got you covered! We'll help you break the process down into manageable steps and add details one layer at a time to achieve realistic-looking hair in your drawings. Read on for a detailed guide on outlining, sketching, shading, highlighting, and more. This tutorial shows how to draw female hair with three different hairstyle variations including natural looking, straight and curly hair.

Again add in the hairline over top of the head drawing. Apply small, circular strokes to the hair area with Terra Cotta. Use a light touch, taking it out into the skin area to create a hairline.

Drawing Hair for Beginners Graphite and Colored Pencil Techniques

Table Of Content Step 5: Adding Final Touches How to Draw Different Eye Types Step by Step Step Four: Fill in the hair with texture Types of...